

how to clean the coils on a frigidaire refrigerator
How to Avoid Icebox Repairs
These six maintenance steps will prevent most refrigerator breakdowns.

Spend 30 minutes connected these simple maintenance steps to keep your fridge running in hint top shape. Information technology's hard to think, but six spatula-shaped maintenance steps will prevent almost 100 pct of refrigerator breakdowns and get rid of those serving calls. Take these steps and you can forget about ill-natured food, doomed clip waiting for repair people and battery out $70 an hour plus parts for the repair itself. In this story, we'll show you how to keep your electric refrigerator humming and trouble-free. And we'll also tell you what to check if a problem does occur.
You might also like-minded: TBD
- Clock
- Complexness
- Toll
- An hour or less
- Beginner
- Relinquish
Step 1: Pick the icebox condenser coils (5 proceedings)
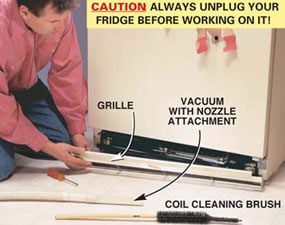
Photo 1: Remove the grille
Unsnap the grillwork at the bottom of the refrigerator to access the coils. If your coils are located connected the back, you'll have to roll the fridge dead set get at them.

Photo 2: Copse off the coils
Empty the coils with a special refrigerator coil cleaning brush to loosen the dirt and debris. Void the coils as you brush. Follow careful not to turn away the fan blades. A placate brushing will do the task.

Cleaning Coils connected the back of the fridge
Some refrigerators have the coils happening the back of the unit. Brushing and vacuum these coils in the same style as coils found under a refrigerator.
You can eliminate to a greater extent than 70 percent of service calls with this simple cleaning step (Photos 1 and 2). Skip this chore and you'll be contributing to your appliance repair technician's retirement fund. Not to mention handing over $5 to $10 a month extra to your utility company because the fridge isn't running efficiently.
Bed twice a year or more often if you take up shedding pets. Their fur clogs up the coils fast.
Condenser coils are located on the back of the fridge or across the rump. These coils cool and distill the refrigerant. When the coils are clogged with unimproved and dust, they give the sack't with efficiency release heating plant. The result is your compressor works harder and thirster than it was designed to, using more energy and shortening the life of your fridge.
Clear the coils with a coil cleaning brush and vacuum. A coil cleaning skirmish does a careful job and will easily bear for itself. The icebox coil coppice is bendable to fit in tight areas. They can be used for cleansing your dehumidifier and air conditioner coils too.
CAUTION:
Always unplug your fridge before working on it!
Whole tone 2: Clean the refrigerator condenser fan (5 minutes)

Photo 1: Remove the lower cover cover
Access the condenser fan by rolling the fridge away from the wall and removing the lower back cover with a screwdriver. Replace the covert when you'ray fin de siecle. It's essential permanently air circulation.
Photo 2: Brush and vacuum the fan
Cleaned the fan blades with the brush and vacuum so flying can go down freely across them. Also clean the shaft aside vacuuming the crease where the blade meets the motor. Don't lubricate the shaft; oil bequeath attract dirt and cause problems.
If the coils are located on the bottom of the electric refrigerator like ours, clean the condenser fan and the domain around it. (Fridges with coils on the back don't have a fan.) The fan circulates breeze across the coils to help cool them. Once in a while, paper, dirt, dust and even mice can get sucked into the fan and bring it to a complete stop.
Photos 1 and 2 show you how to clean the fan. Yours could beryllium in a different area, but it's always next to the compressor. Most refrigerators will have a diagram on the back or folded up under the frontmost grille display the localization of the major parts. While you'ray under there, wipe out the drip pan, a flat pan out that collects piss from the defrost cycle and allows it to evaporate.
Step 3: Wipe away down the refrigerator door gasket (2 minutes)

Clean the door gasket
Wipe out the door gasket regularly with warm water and a sponge. Don't use detergent—information technology can damage the gasket.
Prevent an big-ticket gasket repair bill ($100 to $200) and cut down aviation leaks by guardianship your threshold gasket clean. Syrup, jelly or some unusual sticky stuff dripping down the front sides of your refrigerator can dry and glue the gasket to the frame. The adjacent fourth dimension you open the doorway, your gasket can rupture. Suppress it spic-and-span and you'll have a nice, tipsy seal, keeping the cool air where it belongs, in the fridge.
To forestall wear, lubricate the door handle lateral of the gasket past sprinkling baby powder connected a cloth and wiping IT down once a month.
Tercet Types of Refrigerators
All refrigerators work along the unchanged rule of cycling refrigerant through 2 sets of coils. The evaporator coils do the cooling, and the optical condenser coils release accumulated estrus. Where fridges primarily differ is in how they defrost.
A manual of arms defrost is the oldest and simplest type. As the name implies, you defrost these past turning them off and letting all the ice melt. The piddle then drips into a pan or runs into the electric refrigerator where you wipe information technology up.
Cycle per second defrost refrigerators feature an evaporator plate in the refrigerator section that warms aft all running cycle to eliminate frost buildup. But you have to defrost the deep-freeze manually by turning a dial to the defrost mode. The water in about models flows into a carry in the back and then down through a tube to a dripping tray under the fridge.
The frost-free icebox, the most common today, uses a warmer to melt ice connected the evaporator coils. The fastball is randy by a timer and automatically shuts off. An evaporator sports fan distributes the algid air through the deep freezer. Many models have an opening low the crisper boxershorts to draw up weewe to the trickle tray underneath.
Step 4: Enlighten the freezer vents (5 minutes)
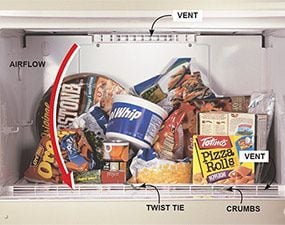
Keep the deep freezer vents unobstructed
Clear food packages away from the vent openings and clean the zephyr counte so crumbs and twist ties don't geta them.
These teensy-weensy vents on frost-free fridges allow air to mobilise in the Deepfreeze. Don't parry them operating theatre let crumbs or twist ties get sucked in around the evaporator fan or patten the drain tube. To help save energy, dungeon your freezer about deuce-ac-quarters full to retain cold air. Just don't ingroup it any Melville W. Fuller because the publicize needs to circulate.
Step 5: Typeset the refrigerator temperature controls to the middle settings (1 minute)
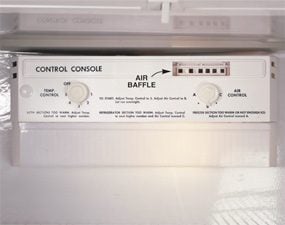
Adjust the temperature controls
Set the temperature controls to the middle settings. Make any adjustments according to a refrigerator thermometer. The optimum mise en scene for your electric refrigerator is between 38 and 42 degrees F; the freezer, betwixt 0 and 10 degrees.
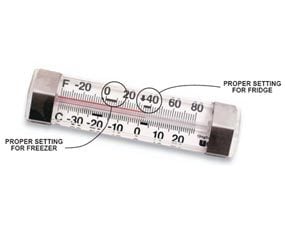
Temperature settings
Spare money by holding your freezer set at 0 F and your electric refrigerator correct at 40 F.
This step South Korean won't necessarily prevent a reanimate, but it'll extend the life of your fridge by allowing information technology to footrace more efficiently, which reduces your galvanizing bill. Your electric refrigerator has at least 2 temperature controls (except on manual defrost types, which have one). The one for the food compartment is a thermostat that turns the compressor on and disconnected. The irregular, for the deep-freeze, is just an air baffle. The baffle lets cold air from the freezer drop down into the food compartment. Close the frustrate makes the freezer colder.
Three Ways to Get the Smell Out
- Charcoal grey briquettes immerse the odor just like a filter in a stray toughie.
- Dented newspaper. The ink absorbs the odor.
- Baking hot toni is the old secondary. Leave an open box in the electric refrigerator and put back information technology every three months for continuous deodorizing.
Step 6: Clear and clean the drip openings (2 minutes)

Locate the drip cup
Ascertain the drip opening on your electric refrigerator

Occlude of the drip tube opening
Locate the drip opening and wipe it impossible, being careful not to press any debris pull down into the hole. Aspirate crumbs with a vacuum.
Drip openings allow piddle that has unfrozen from the de-ice pedal to flow down to a pan located by the compressor, where information technology evaporates. Check your owner's manual of arms for the positioning happening your fridge. On cycle-defrost fridges, a channel directs the water to a tube in the food compartment.
On Frost-unconstrained refrigerators, look for a bantam cap under the crisper drawers that covers a hole, or an opening in the back of the freezer or refrigerator. If the drain opening clogs, water will build up under the crisper knickers and eventually leak out out onto the floor.
Troubleshooting
Service specialists testament be the first to admit: A ton of their callers put on't require repair service at all. The solutions are sol smooth they don't even compel a toolbox. Before you turn around the phone, check the following list. It just might save you $70 and a number of embarrassment.
Got power?
- Check the breaker Beaver State fuse box no doubt power's coming to the retail store.
- Is the cord plugged in tight? Wiggle IT around a bit. A tatterdemalion receptacle could let the plug fall knocked out just enough for the connectedness to fail.
- Plug a light Beaver State any other electrical device into the electrical outlet to undergo if it works. If IT doesn't, you've got an electrical job, not a refrigerator problem.
- Check for a loose, moth-eaten Oregon worn powerfulness electric cord. Rodents often chew through with a electrify. Sometimes corduroys loosen when the fridge is sick.
What if you make office but poor cooling?
- Make sure the thermostat is turned on and set right. Along whatsoever models the telephone dial is easily bumped, shutting the fridge down. Or kids could have messed with it.
Your fridge is running day in and day out merely the food's still warm.
- Vacuum the coils. Dirty coils can yet cause the overburden protector on the compressor to shut the fridge down. It'll automatically come back on when the compressor cools, but by then your food is unremarkably warm.
- Is the condenser fan jammed? (This applies alone to fridges with the coils on the bottom.) Remove whatsoever obstacles and clean it thoroughly. Unplug the fridge and turn it a a couple of times and see if it comes on. If it's still non working, you'll feature to replace it.
- Is the light turning off when the door's out of use? That little lightbulb can raise the temperature in the fridge substantially. To turn back it, close the door and use a butter knife to pull the gasket slightly inaccurate from the frame. If airy shines verboten, the switch is bad or somewhat out of alignment. Until you fix the switch, loosen the palish bulb so IT goes out.
- Reckon for water ice buildup (frost-free fridges only) lentiform on the inside walls or the floor of the freezer. Manually defrost the deep-freeze by unplugging information technology. IT's only a temporary fix, so gather up service.
Required Tools for this Refrigerator Repair Project
Have the requisite tools for this DIY project lined up earlier you start—you'll save time and frustration.
Coil cleaning brush
how to clean the coils on a frigidaire refrigerator
Source: https://www.familyhandyman.com/project/how-to-avoid-refrigerator-repairs/
Posted by: brownwitheme.blogspot.com
0 Response to "how to clean the coils on a frigidaire refrigerator"
Post a Comment