

How To Set Hadoop_home Environment Variable Windows
Hadoop - Enviornment Setup
Hadoop is supported by GNU/Linux platform and its flavors. Therefore, we take to install a Linux operating system for setting up Hadoop environs. In case you take an Bone other than Linux, you can install a Virtualbox software in it and have Linux inside the Virtualbox.
Pre-installation Setup
Before installing Hadoop into the Linux environment, we need to set upwardly Linux using ssh (Secure Shell). Follow the steps given below for setting up the Linux environment.
Creating a User
At the beginning, it is recommended to create a separate user for Hadoop to isolate Hadoop file system from Unix file system. Follow the steps given below to create a user −
-
Open up the root using the command "su".
-
Create a user from the root account using the control "useradd username".
-
At present yous can open an existing user business relationship using the control "su username".
Open up the Linux terminal and type the following commands to create a user.
$ su countersign: # useradd hadoop # passwd hadoop New passwd: Retype new passwd
SSH Setup and Primal Generation
SSH setup is required to do dissimilar operations on a cluster such as starting, stopping, distributed daemon crush operations. To authenticate different users of Hadoop, it is required to provide public/private key pair for a Hadoop user and share information technology with different users.
The following commands are used for generating a key value pair using SSH. Copy the public keys class id_rsa.pub to authorized_keys, and provide the possessor with read and write permissions to authorized_keys file respectively.
$ ssh-keygen -t rsa $ cat ~/.ssh/id_rsa.pub >> ~/.ssh/authorized_keys $ chmod 0600 ~/.ssh/authorized_keys
Installing Java
Coffee is the main prerequisite for Hadoop. Beginning of all, you should verify the existence of java in your system using the control "coffee -version". The syntax of coffee version control is given below.
$ java -version
If everything is in order, it will give you the following output.
java version "1.7.0_71" Coffee(TM) SE Runtime Environment (build one.seven.0_71-b13) Coffee HotSpot(TM) Client VM (build 25.0-b02, mixed mode)
If java is not installed in your system, and then follow the steps given beneath for installing coffee.
Step 1
Download coffee (JDK <latest version> - X64.tar.gz) by visiting the following link www.oracle.com
Then jdk-7u71-linux-x64.tar.gz will be downloaded into your system.
Stride 2
Generally you volition find the downloaded java file in Downloads folder. Verify it and extract the jdk-7u71-linux-x64.gz file using the post-obit commands.
$ cd Downloads/ $ ls jdk-7u71-linux-x64.gz $ tar zxf jdk-7u71-linux-x64.gz $ ls jdk1.seven.0_71 jdk-7u71-linux-x64.gz
Step three
To make java bachelor to all the users, you accept to move it to the location "/usr/local/". Open up root, and type the following commands.
$ su password: # mv jdk1.7.0_71 /usr/local/ # get out
Step four
For setting upwardly PATH and JAVA_HOME variables, add the following commands to ~/.bashrc file.
export JAVA_HOME=/usr/local/jdk1.7.0_71 export PATH=$PATH:$JAVA_HOME/bin
At present use all the changes into the current running system.
$ source ~/.bashrc
Step v
Employ the following commands to configure java alternatives −
# alternatives --install /usr/bin/java java usr/local/coffee/bin/java ii # alternatives --install /usr/bin/javac javac usr/local/java/bin/javac 2 # alternatives --install /usr/bin/jar jar usr/local/java/bin/jar 2 # alternatives --ready java usr/local/coffee/bin/coffee # alternatives --set javac usr/local/java/bin/javac # alternatives --set jar usr/local/java/bin/jar
Now verify the java -version control from the terminal as explained above.
Downloading Hadoop
Download and extract Hadoop 2.4.1 from Apache software foundation using the post-obit commands.
$ su password: # cd /usr/local # wget http://apache.claz.org/hadoop/common/hadoop-2.4.1/ hadoop-2.4.1.tar.gz # tar xzf hadoop-2.four.1.tar.gz # mv hadoop-2.4.1/* to hadoop/ # exit
Hadoop Operation Modes
Once you lot have downloaded Hadoop, y'all can operate your Hadoop cluster in i of the 3 supported modes −
-
Local/Standalone Way − Later downloading Hadoop in your system, past default, it is configured in a standalone fashion and can be run as a unmarried java process.
-
Pseudo Distributed Mode − It is a distributed simulation on single machine. Each Hadoop daemon such every bit hdfs, yarn, MapReduce etc., will run as a dissever java process. This mode is useful for development.
-
Fully Distributed Mode − This manner is fully distributed with minimum 2 or more machines every bit a cluster. We will come across this fashion in item in the coming chapters.
Installing Hadoop in Standalone Mode
Hither we will discuss the installation of Hadoop 2.iv.1 in standalone manner.
There are no daemons running and everything runs in a unmarried JVM. Standalone mode is suitable for running MapReduce programs during development, since it is piece of cake to test and debug them.
Setting Upwardly Hadoop
You can fix Hadoop surroundings variables by appending the following commands to ~/.bashrc file.
export HADOOP_HOME=/usr/local/hadoop
Earlier proceeding farther, you need to make certain that Hadoop is working fine. Just issue the following control −
$ hadoop version
If everything is fine with your setup, then you lot should see the post-obit outcome −
Hadoop 2.four.ane Subversion https://svn.apache.org/repos/asf/hadoop/mutual -r 1529768 Compiled past hortonmu on 2013-10-07T06:28Z Compiled with protoc 2.five.0 From source with checksum 79e53ce7994d1628b240f09af91e1af4
Information technology ways your Hadoop's standalone mode setup is working fine. By default, Hadoop is configured to run in a non-distributed mode on a single machine.
Example
Let'due south check a simple case of Hadoop. Hadoop installation delivers the following example MapReduce jar file, which provides basic functionality of MapReduce and can be used for calculating, similar Pi value, word counts in a given list of files, etc.
$HADOOP_HOME/share/hadoop/mapreduce/hadoop-mapreduce-examples-2.two.0.jar
Let'southward take an input directory where we will push a few files and our requirement is to count the total number of words in those files. To calculate the full number of words, we practise not need to write our MapReduce, provided the .jar file contains the implementation for discussion count. You tin can try other examples using the same .jar file; just issue the post-obit commands to check supported MapReduce functional programs by hadoop-mapreduce-examples-2.two.0.jar file.
$ hadoop jar $HADOOP_HOME/share/hadoop/mapreduce/hadoop-mapreduceexamples-2.2.0.jar
Stride 1
Create temporary content files in the input directory. You can create this input directory anywhere y'all would like to piece of work.
$ mkdir input $ cp $HADOOP_HOME/*.txt input $ ls -l input
It volition give the following files in your input directory −
total 24 -rw-r--r-- 1 root root 15164 February 21 10:14 LICENSE.txt -rw-r--r-- 1 root root 101 Feb 21 10:14 Observe.txt -rw-r--r-- i root root 1366 Feb 21 ten:fourteen README.txt
These files have been copied from the Hadoop installation home directory. For your experiment, y'all can have unlike and large sets of files.
Stride 2
Let'southward offset the Hadoop process to count the total number of words in all the files available in the input directory, as follows −
$ hadoop jar $HADOOP_HOME/share/hadoop/mapreduce/hadoop-mapreduceexamples-ii.2.0.jar wordcount input output
Step three
Footstep-2 will do the required processing and save the output in output/office-r00000 file, which you tin can check by using −
$true cat output/*
It will list down all the words forth with their full counts available in all the files available in the input directory.
"AS 4 "Contribution" 1 "Correspondent" 1 "Derivative 1 "Legal 1 "License" 1 "License"); ane "Licensor" 1 "NOTICE" i "Not 1 "Object" 1 "Source" 1 "Piece of work" 1 "Yous" one "Your") 1 "[]" 1 "command" 1 "printed i "submitted" one (50%) 1 (BIS), 1 (C) 1 (Don't) 1 (ECCN) 1 (INCLUDING 2 (INCLUDING, two .............
Installing Hadoop in Pseudo Distributed Manner
Follow the steps given below to install Hadoop 2.4.1 in pseudo distributed mode.
Footstep 1 − Setting Upward Hadoop
Y'all can set Hadoop environs variables by appending the following commands to ~/.bashrc file.
export HADOOP_HOME=/usr/local/hadoop consign HADOOP_MAPRED_HOME=$HADOOP_HOME export HADOOP_COMMON_HOME=$HADOOP_HOME export HADOOP_HDFS_HOME=$HADOOP_HOME export YARN_HOME=$HADOOP_HOME export HADOOP_COMMON_LIB_NATIVE_DIR=$HADOOP_HOME/lib/native export PATH=$PATH:$HADOOP_HOME/sbin:$HADOOP_HOME/bin consign HADOOP_INSTALL=$HADOOP_HOME
Now utilize all the changes into the current running system.
$ source ~/.bashrc
Pace two − Hadoop Configuration
You tin find all the Hadoop configuration files in the location "$HADOOP_HOME/etc/hadoop". It is required to make changes in those configuration files according to your Hadoop infrastructure.
$ cd $HADOOP_HOME/etc/hadoop
In social club to develop Hadoop programs in java, you have to reset the java environment variables in hadoop-env.sh file past replacing JAVA_HOME value with the location of coffee in your system.
export JAVA_HOME=/usr/local/jdk1.7.0_71
The following are the list of files that yous have to edit to configure Hadoop.
core-site.xml
The cadre-site.xml file contains information such as the port number used for Hadoop instance, memory allocated for the file system, memory limit for storing the data, and size of Read/Write buffers.
Open the core-site.xml and add the following properties in between <configuration>, </configuration> tags.
<configuration> <property> <proper noun>fs.default.name</name> <value>hdfs://localhost:9000</value> </property> </configuration>
hdfs-site.xml
The hdfs-site.xml file contains information such as the value of replication information, namenode path, and datanode paths of your local file systems. It means the place where you want to shop the Hadoop infrastructure.
Let u.s. presume the following data.
dfs.replication (data replication value) = 1 (In the below given path /hadoop/ is the user name. hadoopinfra/hdfs/namenode is the directory created by hdfs file arrangement.) namenode path = //habitation/hadoop/hadoopinfra/hdfs/namenode (hadoopinfra/hdfs/datanode is the directory created by hdfs file system.) datanode path = //home/hadoop/hadoopinfra/hdfs/datanode
Open up this file and add together the following properties in between the <configuration> </configuration> tags in this file.
<configuration> <property> <name>dfs.replication</name> <value>ane</value> </property> <property> <proper noun>dfs.name.dir</proper name> <value>file:///habitation/hadoop/hadoopinfra/hdfs/namenode </value> </property> <property> <proper noun>dfs.information.dir</proper noun> <value>file:///home/hadoop/hadoopinfra/hdfs/datanode </value> </property> </configuration>
Note − In the above file, all the property values are user-defined and you tin can make changes according to your Hadoop infrastructure.
yarn-site.xml
This file is used to configure yarn into Hadoop. Open the yarn-site.xml file and add the post-obit properties in between the <configuration>, </configuration> tags in this file.
<configuration> <property> <name>yarn.nodemanager.aux-services</name> <value>mapreduce_shuffle</value> </belongings> </configuration>
mapred-site.xml
This file is used to specify which MapReduce framework we are using. By default, Hadoop contains a template of yarn-site.xml. First of all, it is required to copy the file from mapred-site.xml.template to mapred-site.xml file using the following command.
$ cp mapred-site.xml.template mapred-site.xml
Open mapred-site.xml file and add together the following properties in between the <configuration>, </configuration>tags in this file.
<configuration> <property> <proper name>mapreduce.framework.proper name</name> <value>yarn</value> </holding> </configuration>
Verifying Hadoop Installation
The post-obit steps are used to verify the Hadoop installation.
Step 1 − Name Node Setup
Fix upward the namenode using the command "hdfs namenode -format" every bit follows.
$ cd ~ $ hdfs namenode -format
The expected effect is as follows.
10/24/14 21:thirty:55 INFO namenode.NameNode: STARTUP_MSG: /************************************************************ STARTUP_MSG: Starting NameNode STARTUP_MSG: host = localhost/192.168.ane.11 STARTUP_MSG: args = [-format] STARTUP_MSG: version = 2.4.ane ... ... 10/24/14 21:xxx:56 INFO common.Storage: Storage directory /home/hadoop/hadoopinfra/hdfs/namenode has been successfully formatted. x/24/14 21:30:56 INFO namenode.NNStorageRetentionManager: Going to retain 1 images with txid >= 0 10/24/fourteen 21:30:56 INFO util.ExitUtil: Exiting with status 0 10/24/xiv 21:30:56 INFO namenode.NameNode: SHUTDOWN_MSG: /************************************************************ SHUTDOWN_MSG: Shutting downward NameNode at localhost/192.168.ane.11 ************************************************************/
Step 2 − Verifying Hadoop dfs
The post-obit control is used to start dfs. Executing this command will get-go your Hadoop file system.
$ start-dfs.sh
The expected output is as follows −
10/24/14 21:37:56 Starting namenodes on [localhost] localhost: starting namenode, logging to /dwelling/hadoop/hadoop 2.4.1/logs/hadoop-hadoop-namenode-localhost.out localhost: starting datanode, logging to /home/hadoop/hadoop 2.four.1/logs/hadoop-hadoop-datanode-localhost.out Starting secondary namenodes [0.0.0.0]
Stride iii − Verifying Yarn Script
The following command is used to get-go the yarn script. Executing this command volition offset your yarn daemons.
$ start-yarn.sh
The expected output as follows −
starting yarn daemons starting resourcemanager, logging to /dwelling/hadoop/hadoop 2.four.i/logs/yarn-hadoop-resourcemanager-localhost.out localhost: starting nodemanager, logging to /home/hadoop/hadoop ii.4.1/logs/yarn-hadoop-nodemanager-localhost.out
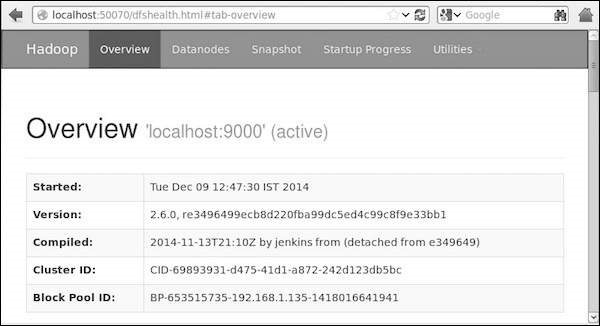
Pace four − Accessing Hadoop on Browser
The default port number to access Hadoop is 50070. Employ the following url to get Hadoop services on browser.
http://localhost:50070/
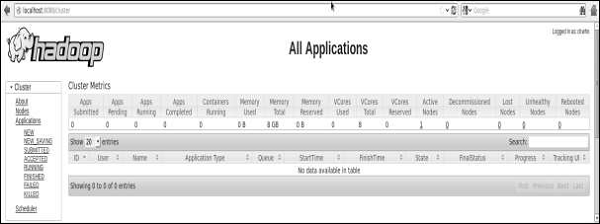
Step 5 − Verify All Applications for Cluster
The default port number to admission all applications of cluster is 8088. Apply the following url to visit this service.
http://localhost:8088/
Source: https://www.tutorialspoint.com/hadoop/hadoop_enviornment_setup.htm
Posted by: brownwitheme.blogspot.com
0 Response to "How To Set Hadoop_home Environment Variable Windows"
Post a Comment